
Shopify has always been an e-commerce platform first and a Content Management System (CMS) second. Shopify makes it easy for store owners to manage products, variants, collections, tags, and shipping models in a user-friendly admin, all while keeping security at the forefront. And with simple integration with dozens of payment gateways, it has become one of the most popular e-commerce platforms for businesses big and small. But how does Shopify stack up as a CMS? Let’s take a look at two big improvements that Shopify has made.
Sections and Blocks
As with many other popular CMSs, the out-of-the-box Shopify page editor is pretty barebones; title, content, and basic SEO. Unlike other popular CMSs, it wasn’t always easy to expand the page content options beyond these basic elements. Sure, you could install a third-party metafields app or browser extension, but that’s far from user-friendly and can be fairly limiting. In late 2016, Shopify introduced Sections, which gave theme developers the ability to create custom admin-editable interfaces that allow store owners to easily add, edit, and reorder custom content. Even cooler, all updates can be previewed in real-time before being published.
Sections were a total game-changer, but what if you need repeatable content? Shopify has you covered with Blocks. Blocks extend the functionality of Sections by allowing theme developers to create a group of fields that can then be repeated. An example of where this could be useful is a page section with a title, some copy, and an image carousel with a title for each image. The theme developer has no way of knowing how many images will be in the carousel and creating multiple image_picker fields in the Section is cumbersome and not easily scalable. Let’s see how Blocks make this scenario a breeze.
We start by creating a new file in the “sections” directory of our site. Let’s call it “carousel.liquid”
Next, we’ll set up our Schema. The Schema determines what fields will appear in your admin and should always be at the very bottom of your file. Schemas use the same JSON formatting as the settings_schema.json file. If you’re not familiar with this file or Shopify Theme Settings, take a gander at the documentation.
Here is the entire Schema, which I will break down piece by piece:
{% schema %}

{

"name": "Carousel Section",

"presets": [

{

"name": "Carousel Section",

"category": "Homepage Content"

}

],

"settings": [

{

"type": "text",

"id": "title",

"label": "Title"

},

{

"type": "richtext",

"id": "text",

"label": "Text"

}

],

"blocks": [

{

"type": "carousel-image",

"name": "Carousel Image",

//"limit": 5,

"settings": [

{

"type": "image_picker",

"id": "image",

"label": "Image"

},

{

"type": "text",

"id": "title",

"label": "Title"

}

]

}

]

}

{% endschema %}
First we open our {% schema %} tag and create our Section.
{% schema %}

{

"name": "Carousel Section",

"presets": [

{

"name": "Carousel Section",

"category": "Homepage Content"

}

],
Next, we add some Section settings. These are our static title and copy. The ”type” setting dictates what kind of field will be added in the admin. The ”id” setting is what you will reference to render the content. ”label” is simply the label that will appear in the admin above the field.
"settings": [

{

"type": "text",

"id": "title",

"label": "Title"

},

{

"type": "richtext",

"id": "text",

"label": "Text"

}

],
Finally, we add our Block and close the Schema with the {% endschema %} tag. You can have as many Blocks in a Section as your heart desires, but for this example we just need one. The Block ”type” setting is required, but the value is up to you. This setting is used to differentiate it from other Blocks in the Section if you have more than one. The Block ”name” is also up to you. Block “settings” follow the same rules as Section ”settings”.
"blocks": [

{

"type": "carousel-image",

"name": "Carousel Image",

//"limit": 5,

"settings": [

{

"type": "image_picker",

"id": "image",

"label": "Image"

},

{

"type": "text",

"id": "title",

"label": "Title"

}

]

}

]

}

{% endschema %}
Also notice the “limit” setting that is commented out above. This is handy if you want to limit the amount of times the Block can be repeated. For a full list of Section and Block settings, check out the documentation.
Now that we have our Schema created we need to render the content that will be entered into it via the admin. I’ll leave the markup to you, but this is how to render Section and Block content.
Section content is pretty straightforward. In the same carousel.liquid file, above your Schema, start with section.settings. followed by the ”id” of the ”settings” you want to display and wrap the whole thing in double curly brackets {{ }}. It should look something like this:
{{ section.settings.title }}
Since Block content is repeatable, we’ll use the trusty {% for %} loop to render Block content. If you have only one Block in your Section your loop can be as simple as:
{% for block in section.blocks %}

{{ block.settings.title }}

{% endfor %}
If you have more than one Block in a Section just use a good ol’ {% if %} to check against the Block ”type” to determine when and where to display specific Blocks. I always do this regardless of how many Blocks I have just in case I add more later.
{% for block in section.blocks %}

{% if block.type == "carousel-image" %}

{{ block.settings.title }}

{% endif %}

{% endfor %}
The {% for %} will loop as many times as the Block is repeated in the admin Section.
To display this Section on your Shopify site, just add {% section 'carousel' %} to any page template file. After you’ve created your page in your admin and selected the page template to which you added your Section, go to Online Store -> Customize. At the top left there is a drop-down with all of your pages. Select your page. The resulting admin interface will look something like this:
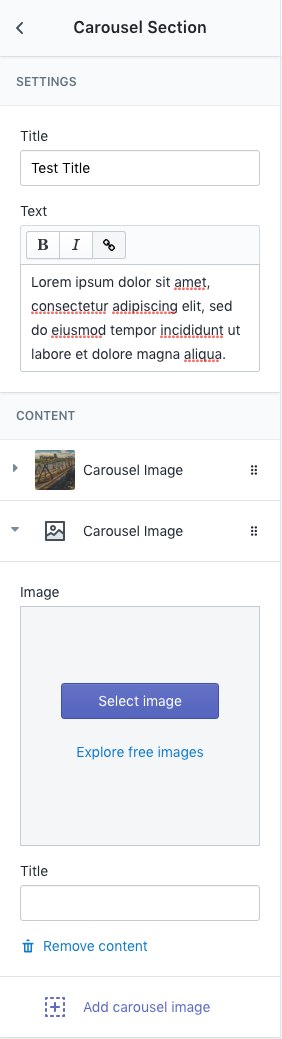
Notice the static “Title” and “Text” fields followed by the repeatable “Carousel Image.” By simply clicking “Add carousel image” you can add as many Carousel Images as you’d like.
Sections and Blocks open up a world of custom content possibilities. That being said, it can be a little confusing from a content organization standpoint because the standard page title and content are separate from the custom Sections. Another shortcoming is their lack of reusability. Aside from the Homepage, the content for each unique Section will be the same on all pages. But this is a small price to pay for the level of flexibility that they offer.
Nested Navigation Menus
If you’ve been working in Shopify for a while you know that in the past creating navigation drop-down menus was a total pain. Each drop-down had to be in its own separate menu and had to have exactly the same name as the navigation item under which you wanted it to appear. This resulted in a very messy Navigation admin section and was a headache for theme developers.
Fortunately, those days are over with Shopify’s Nested Navigation Menus. The new nested menus can go up to three levels deep and make creating and editing your site’s navigation menus much more intuitive. Now, all of your top level navigation items and their drop downs can all live under one menu.
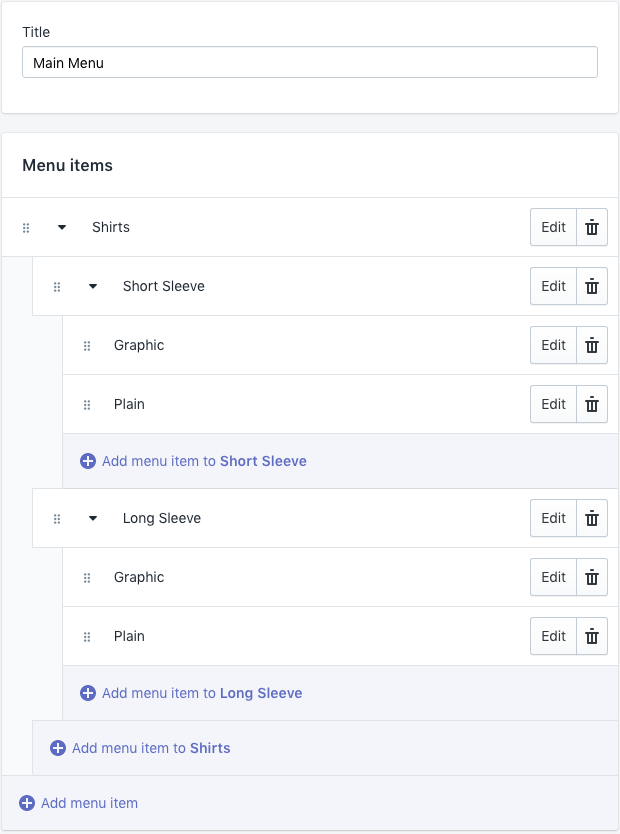
By simply dragging and dropping, navigation items can be reordered and placed under first and second level items to create nested navigation.
This also dramatically simplifies the liquid markup for theme developers. No longer do we have to check if the title of the drop down menu matches the title of the nav item. This example of the simplified liquid markup is straight from the Shopify docs.
<ul>

{% for link in linklists.main-menu.links %}

<li>

<a href="{{ link.url }}">{{ link.title | escape }}</a>

{% if link.links != blank %}

<ul class="dropdown">

{% for child_link in link.links %}

<!-- ... --->
How great is that? But what if you already went through all the trouble to code it the old, long way but want to enjoy the organizational advantages of Nested Navigation Menus? Shopify has your back with backward compatibility. No updates to your code are necessary. More details on that are also available in the docs.
Needless to say, Nested Navigation Menus are a huge improvement for store owners and theme developers alike.
Conclusion
Shopify is an amazing e-commerce platform that makes selling products online possible for just about anyone. Its admin interface is amazingly user-friendly, it’s extremely secure (Level 1 PCI DSS compliant), and the customer and technical support is top notch. Not to mention the documentation is impeccable. Combine all that with its capabilities as a CMS, and you’ve got an incredible solution for creating an e-commerce website.